- CentOS 6.3 – 64 bits. http://isoredirect.centos.org/centos/6/isos/x86_64/
- Oracle 11gR2 (11.2.0.1.0). http://www.oracle.com/technetwork/database/enterprise-edition/downloads/index.html you should select Linux x86-64 option.
- PTC Downloads – Windchill PDM Link – Release 10.1 http://www.ptc.com/appserver/auth/it/esd/product.jsp?prodFamily=WPD
o PTC Solution Installer F000 (MED-60702-CD-101_F000)
o Windchill 10.1 Info*Engine F000 (MED-60171-CD-101_F000)
o Windchill PDMLink 10.1 F000 (MED-60379-CD-101_F000)
o Windchill 10.1 Services F000 (MED-60418-CD-101_F000)
o Windchill 10.1 Third Party Software F000 (MED-60419-CD-101_F000)
o Java Software Development Kit for Windchill 10.1 F000 (MED-60703-CD-101_F000)
o Windchill 10.1 Help Center F000 (MED-60757-CD-101_F000)
o Windchill 10.1 Directory Server (MED-60800-CD-101_F000)
If you are using a Virtual Machine (I’m using VMWare Player), I recommend you to download and unzip all the stuff on CentOS and don’t use a Share Folder to make use of those files.
Install Oracle Database.
The first thing we should do is Install Oracle Database. Oracle has repository (http://public-yum.oracle.com/) for a pre-install requirements for CentOS (who is not certified) and Red Hat Enterprise Linux, but I DON’T recommend using it, as I had a lot of problems when I ran and install that repository.
That’s why we are going to configure those prerequisites manually; first we have to create two groups (Oracle Defaults). NOTE: we are creating these groups as root user.
· groupadd oinstall
· groupadd dba
We have to create an oracle user; this user will run the Oracle installer.
· useradd -g oinstall -G dba oracle
Now, we are going to create a directory where we will install Oracle, I’ll use home for oracle user: /home/oracle/app/ and we have to assign permissions.
mkdir -p /home/oracle/app
· chown -R oracle:oinstall /home/oracle/app
· chmod -R 755 /home/oracle/app
When you downloaded Oracle Database, you get two files, extract those Oracle zip files.
· unzip linux.x64_11gR2_database_1of2.zip /home/oracle/
· unzip linux.x64_11gR2_database_2of2.zip /home/oracle/
Or just, right-click Extract.
It will create a folder named database and it’ll look like this /home/oracle/database. Then you will need to install Oracle Database and you’ll have to do it as oracle user. NOTE: For a better and organized work, I recommend you to open a different terminal tab: one for root and one for oracle user.
· su oracle
· cd /home/oracle/database
· ./runInstaller
If you receive this error:
Checking monitor: must be configured to display at least 256 colors
>>> Could not execute auto check for display colors using command /usr/bin/xdpyinfo. Check if the DISPLAY variable is set. Failed <<<<
Press n to cancel the installation and I recommend you to export your DISPLAY variable and run an xhost command as root user:
· export DISPLAY=:0.0
· xhost +SI:localuser:oracle
Then run installer again as oracle user. It should work fine.
Inside the Oracle Database installer:
· Uncheck the security updates checkbox and click Next
· Click Yes on the popup window
· Select Install database software only option (PSI will setup our database later) and click Next
· Select Single instance database installation and click Next
· Selected languages English click Next
· Select Enterprise Edition option and click Next
· Specify Oracle Base and Oracle Software files paths.
o Oracle Base: /home/oracle/app/oracle
o Software Location: /home/oracle/app/oracle/product/11.2.0/dbhome_1
Normally these are the default paths. Click Next.
· Specify the Oracle Inventory path and the oraInventory group name.
o Inventory Directory: /home/oracle/app/oraInventory
o ora Inventory Group Name: oinstall
· Select Database Administrator (OSDBA) group as dba and Database Operator (OSOPER) group as oinstall. Normally these are default. Click Next.
· Prerequisites Check stage, you will see a lot of failed prerequisites, click on Fix & Check Again button. You’ll be prompted to run a command; do it as root user:
o cd /tmp/CVU_11.2.0.1.0_oracle/
o ./runfixup.sh
Then you should install all the dependencies remaining; run the yum command as root user.
o yum install gcc gcc-c++ compat-libstdc++-33 elfutils-libelf-devel libaio-devel libstdc++-devel unixODBC unixODBC-devel
o press y to download
o press y to install
After installing those dependencies click Fix & Check Again, –dependencies are still there right? –But I already installed it! – Calm down, just check Ignore All option and click Next.
· Summary section stage, just click Finish!
After get 100% of the installation you’ll be prompted to run two commands as root user:
o cd /home/oracle/app/oraInventory/
o ./orainstRoot.sh
o cd /home/oracle/app/oracle/product/11.2.0/dbhome_1/
o ./root.sh
· Done!
Installing PTC Windchill PDM Link
In order to install PDM Link you have to unzip those files that you downloaded, I recommend you to unzip all files except the PTC Solution Installer, extract those files and it will be your Staging Directory.
After you unzipped it should look like this:
· cd /root/Downloads/
· mkdir –p StageDirectory
· cd /root/Downloads/StageDirectory/
· ls
MED-60171-CD-101_F000 MED-60379-CD-101_F000 MED-60418-CD-101_F000 MED-60419-CD-101_F000 MED-60703-CD-101_F000 MED-60757-CD-101_F000 MED-60800-CD-101_F000
Then unzip the PTC Solution Installer in other folder just to differentiate from the others (because it needs other folders inside StageDirectory). I did it in /root/Downloads. It should look like this.
· cd /root/Downloads/
· ls
· MED-60702-CD-101_F000
· cd MED-60702-CD-101_F000
In order to run the installer inside the PSI folder execute next commands as root user.
If you want to see what’s happening during installation, I recommend you to use DEBUG MODE, to activate you have to set an environment variable and then run the command to begin installation.
· export LAX_DEBUG=1
· ./setup
Inside the PTC Solution Installer
· After you execute the PSI, you’ll be prompted to choose a language, English is default, click OK.
· On ‘Before you begin’ section you’ll see a summary of your release version, click Next.
· On ‘License Agreement’ section, READ ALL PTC CUSTOMER AGREEMENT (joking!); select I accept and click Next.
· On Install Type Options section, select Solution and click Next
· On Select Product section, select Windchill PDM Link and click Next.
o You don’t need to install additional software, click Next
o You’ll be prompted to select the platform components, just confirm that Java SDK, Apache Web Server and Windchill Directory Server are set to Install and Configure and Database Software is set to Oracle and click Next.
o You don’t need optional features, click Next.
o We have to specify our database configuration, you have to select Create Database and Create Database Installation User and click Next.
o We are installing a development environment so, select Non-Production option and click Next.
o Enter your email address just to pass to the next option, click Next.
o Click Yes in the pop-up window.
· On ‘Define Setting’ section, you have to choose users who should run the commands. In the first input type root, because you’ll install as root user and for the database input type oracle, because the database was installed by oracle user and click Next.
o You might install on a different path than default, we going to use the default path for our components, it should start like /opt/ptc/Windchill_10.1/ and click Next.
o Select Create database schema and Load base data options and click Next.
o Then you have to specify a host name for you web server and your servlet engine, these are the default options:
§ Web Server DNS Registered Host Name: localhost
§ HTTP Port Number: 80
§ HTTPS Port Number: 443
§ Servlet Engine Web Server Listener Port Number: 8010
§ Servlet Engine DNS Registered Host Name: localhost
We have to change our Web Server DNS Registered Host Name to localhost.localdomain because it’s the default on the /etc/hosts file; leave the rest of the options as defaults.
o Select English as Base Data Language and click Next.
o Select Demo/Test (5000 MB) as Database Size and click Next.
o You have to enter your database information, these are the default options:
§ Oracle Server Installation Directory (ORACLE_HOME): <ORACLE_HOME>
§ Oracle Database DNS Registered Host Name: localhost
§ Oracle Database Listener Port Number: 1521
§ Oracle Database System Identifier (SID): wind
§ Oracle ‘SYSTEM’ Account Password:
§ Confirm Oracle ‘SYSTEM’ Account Password:
§ Oracle User Name for Windchill Installation:
§ Oracle User Password for Windchill Installation:
§ Confirm Oracle User Password for Windchill Installation:
§ Default Tablespace Name: USERS
§ Temporary Tablespace Name: TEMP
We have to fill/modify some options and it should look like this according to our previous configuration:
§ Oracle Server Installation Directory (ORACLE_HOME): /home/oracle/app/oracle/product/11.2.0/dbhome_1
§ Oracle Database DNS Registered Host Name: localhost
§ Oracle Database Listener Port Number: 1521
§ Oracle Database System Identifier (SID): wind
§ Oracle ‘SYSTEM’ Account Password: oracle
§ Confirm Oracle ‘SYSTEM’ Account Password: oracle
§ Oracle User Name for Windchill Installation: wcadmin
§ Oracle User Password for Windchill Installation: wcadmin
§ Confirm Oracle User Password for Windchill Installation: wcadmin
§ Default Tablespace Name: USERS
§ Temporary Tablespace Name: TEMP
Click Next.
o You have to specify the settings to access the LDAP Server, these are the default options:
§ LDAP Server DNS Registerd Host Name: localhost
§ LDAP Server Port Number: 389
§ LDAP Server Administrator Distinguished Name: cn=Manager
§ LDAP Server Administrator Password:
§ Confirm LDAP Server Administrator Password:
§ LDAP Base DN: o=ptc
§ LDAP Server Administation Port: 4444
§ LDAP Server JMX Access Port Number: 1689
§ Base Distinguished Name for Product Properties: cn=configuration,cn=Windchill_10.1,o=ptc
§ Base Distinguished Name for Administrative Users: ou=people,cn=AdministrativeLdap,cn=Windchill_10.1,o=ptc
§ Base Distinguished Name for Enterprise Users: ou=people,cn=EnterpriseLdap,cn=Windchill_10.1,o=ptc
§ Unchecked Enable Separate Enterprise LDAP Server.
We have to fill/modify some options and it should look like this according to our previous configuration:
§ LDAP Server DNS Registerd Host Name: localhost.localdomain
§ LDAP Server Port Number: 389
§ LDAP Server Administrator Distinguished Name: cn=Manager
§ LDAP Server Administrator Password: ldapadmin
§ Confirm LDAP Server Administrator Password: ldapadmin
§ LDAP Base DN: o=ptc
§ LDAP Server Administation Port: 4444
§ LDAP Server JMX Access Port Number: 1689
§ Base Distinguished Name for Product Properties: cn=configuration,cn=Windchill_10.1,o=ptc
§ Base Distinguished Name for Administrative Users: ou=people,cn=AdministrativeLdap,cn=Windchill_10.1,o=ptc
§ Base Distinguished Name for Enterprise Users: ou=people,cn=EnterpriseLdap,cn=Windchill_10.1,o=ptc
§ Keep it unchecked Enable Separate Enterprise LDAP Server.
Click Next.
o Then, you have to enter the administrative settings. These are the default options:
§ Windchill Site Administrator: Create New
§ Windchill Site Administrator User Name: wcadmin
§ Windchill Site Administrator Password:
§ Confirm Windchill Site Administrator Password:
§ Select the Repository Where the Site Administrator is Stored: Administrative
§ Web Application Context Root: Windchill
§ Info*Engine Server Task Processor Port Number: 10002
§ Initial Organization Name:
§ Organization Internet Domain Name: localhost
We have to fill/modify some options and it should look like this according to our previous configuration:
§ Windchill Site Administrator: Create New
§ Windchill Site Administrator User Name: wcadmin
§ Windchill Site Administrator Password: wcadmin
§ Confirm Windchill Site Administrator Password: wcadmin
§ Select the Repository Where the Site Administrator is Stored: Administrative
§ Web Application Context Root: Windchill
§ Info*Engine Server Task Processor Port Number: 10002
§ Initial Organization Name: <Your Company> (Mine is Kalypso)
§ Organization Internet Domain Name: localhost.localdomain
Click Next.
o Specify where to create links, select Don’t create links option, click Next.
o Specify the path to you StageDirectory folder: /root/Downloads/StageDirectory for this installation and click Next
o You will see all the solutions that you downloaded before, click Next.
· On the ‘Review Settings’ section I recommend you to save the summary just to have a backup of your information that you entered then click Install.
· Done!
Errors during Installation:
I encountered some issues during installation; those are mostly permissions errors and system operation issues.
You might receive the next following errors:
Error: ocu installer failed to start
If you look at /opt/ptc/Windchill_10.1/PSI/Installer/logs/PTCSOLNINSTALLER_PtcInstall.log and at the end of file you see these lines (usually at the bottom):

This means that PSI wanted to run a command as oracle user but that command is on a root user folder.
Solution: What I did to resolve this error was to change owner of root home. Running this command:
chown –R oracle:oinstall /root/
Run the PSI again.
Error: Windchill loader failed to install
If you look at /opt/ptc/Windchill_10.1/PSI/Installer/logs/PTCSOLNINSTALLER_PtcInstall.log and at the end of file you see these lines (usually at the bottom):
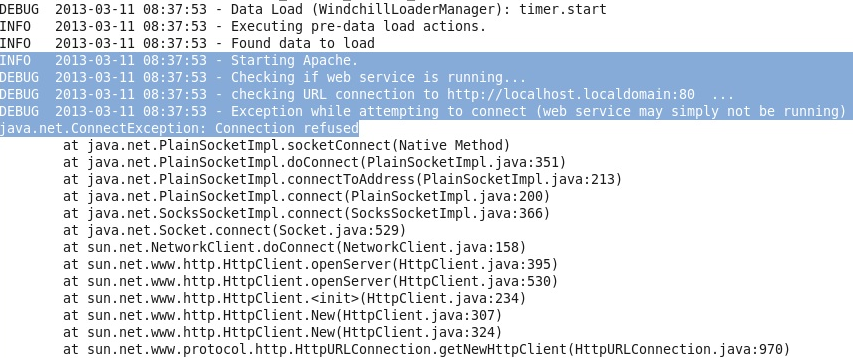
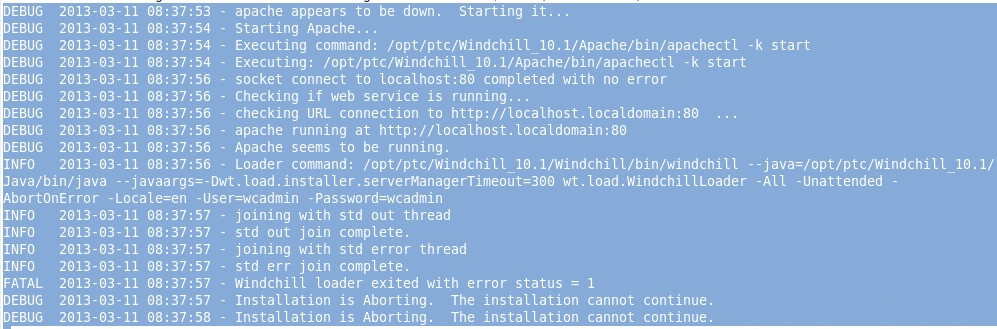
The installer tries to run Apache and it’s down, the installer starts it and then run the next command to initialize the Windchill Loader:
/opt/ptc/Windchill_10.1/Windchill/bin/windchill –java=/opt/ptc/Windchill_10.1/Java/bin/java –javaargs=-Dwt.load.installer.serverManagerTimeout=300 wt.load.WindchillLoader -All -Unattended -AbortOnError -Locale=en -User=wcadmin -Password=wcadmin
If you try to run only this command in Terminal it throws the next exception:
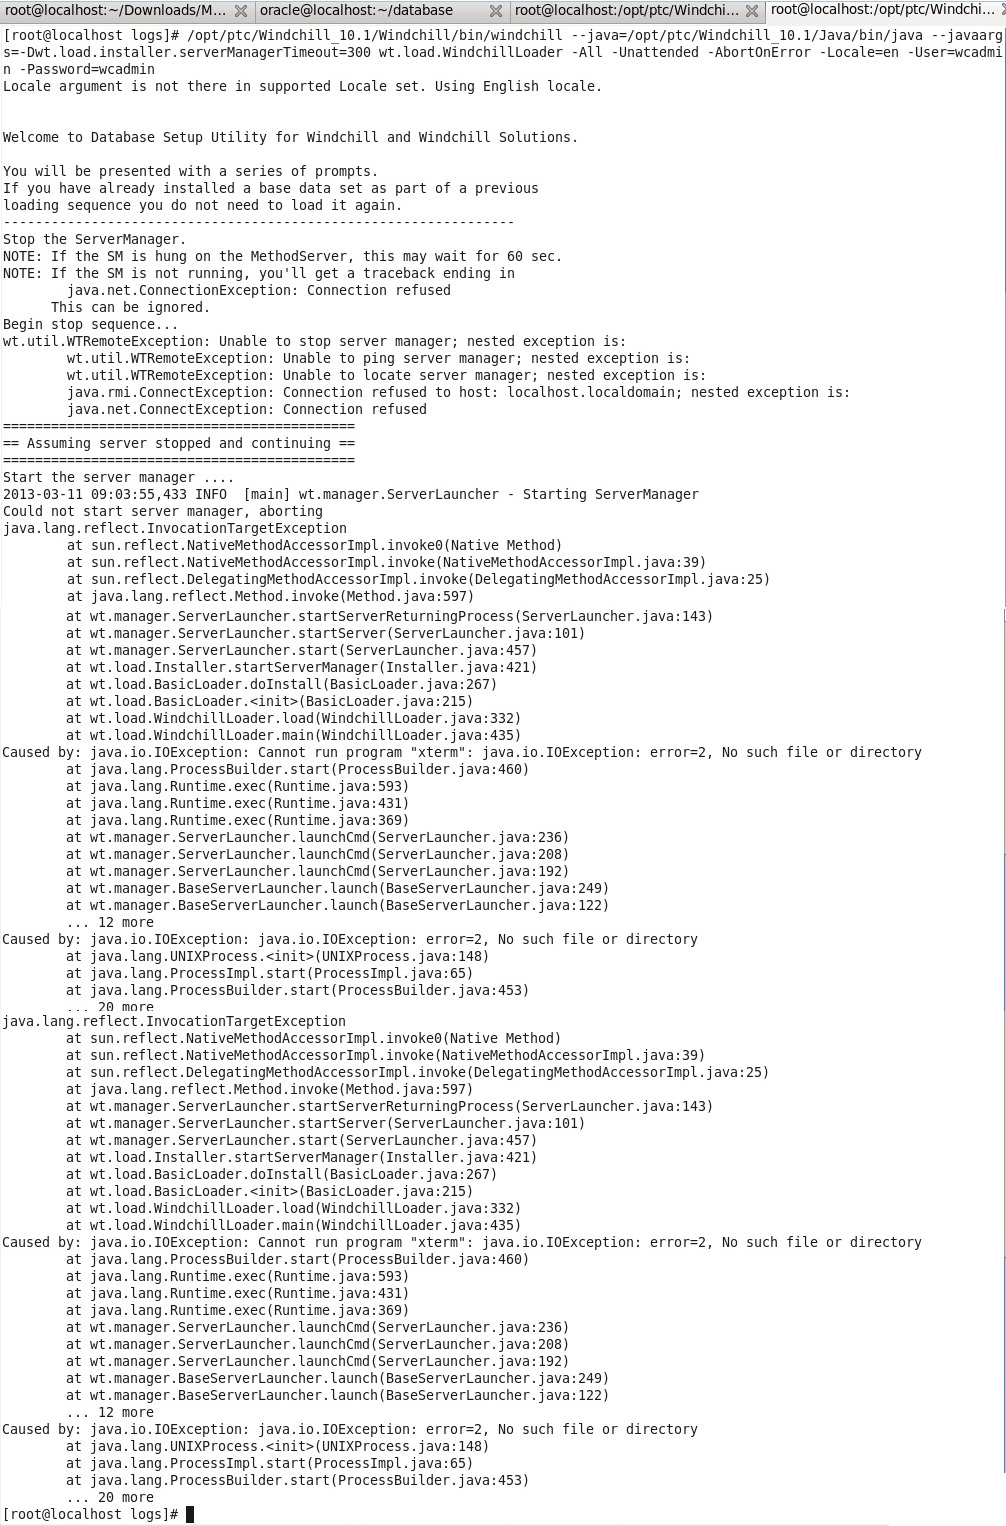
Somewhere it says: Cannot run program “xterm”… It seems that PSI needs xterm to continue so we have to install it. In a terminal tab run the next command: yum install xterm as root user. It’ll start the download and the installation just type y when asked.
Run the installer again and verify this command execute correctly.
Other Errors
Apache Server Related
The errors thrown by the PTC Solution Installer are not very detailed so, that’s why you have to use DEBUG Mode and look at the log file to see what’s really happening and that’s why I copied my errors on this manual, I’m going to describe others errors that I encountered (I made this installation in 2 machines, just to confirm).
When the installer tries to run Windchill Loader it needs Apache up and running, Apache is installed by PSI (using Windchill 10.1 Third Party Software downloaded before) and it’s installed on /opt/ptc/Windchil_10.1/Apache. So, the installer runs a command to start Apache, something like this: /opt/ptc/Windchill_10.1/Apache/bin/apachectl start and it should be running.
BUT, CentOS used on this manual already has an Apache HTTP Server installed and it might be started at boot, so be careful when try to start apache because when you type apachectl start, you might be starting the default Apache Server and you might receive a Connection Refused erron when the installer tries to use Windchill Loader or when you try to start the Method Server:
ERROR [main] wt.org.StandardOrganizationServicesManager –
java.io.IOException: com.infoengine.exception.adapter.IEAdapterException; nested exception is:
javax.naming.CommunicationException: localhost.localdomain:80 [Root exception is java.net.ConnectException: Connection refused]
java.io.IOException: com.infoengine.exception.adapter.IEAdapterException; nested exception is:
javax.naming.CommunicationException: localhost.localdomain:80 [Root exception is java.net.ConnectException: Connection refused]
To stop httpd service started at boot of your Operating System, I recommend you to use these commands:
sudo netstat -ltnp | grep httpd
And you’ll receive something like this:
tcp 0 0 0.0.0.0:80 0.0.0.0:* LISTEN 3094/httpd
You should kill that process and start the Apache Located on your installation path. Command to kill:
kill -9 3094
Note: the last number is your process Id (PID).
Then try again to run the PSI or start your MethodServer.
Windchill DS (LDAP Server) Related
Also, I experimented an exception when the installer tried to run Windchill Loader command. The exception was a connection refused error but this time by the LDAP Server (Windchill DS), that’s why at the very final of installation the PSI tries to start the Method Server and if the Windchill DS is not up and running you will receive an exception like this:
INFO [main] wt.system.out – javax.naming.CommunicationException: localhost.localdomain:389 [Root exception is java.net.ConnectException: Connection refused]
ERROR [main] wt.org.StandardOrganizationServicesManager –
java.io.IOException: com.infoengine.exception.adapter.IEAdapterException; nested exception is:
javax.naming.CommunicationException: localhost.localdomain:389 [Root exception is java.net.ConnectException: Connection refused]
java.io.IOException: com.infoengine.exception.adapter.IEAdapterException; nested exception is:
javax.naming.CommunicationException: localhost.localdomain:389 [Root exception is java.net.ConnectException: Connection refused]
You must start Windchill Directory Server with this command:
/opt/ptc/Windchill_10.1/WindchillDS/server/bin/start-ds
If it was successful, try again to run the PSI or start your MethodServer.
That’s all if you have any questions or comments please let me know! 🙂